
Table of Contents
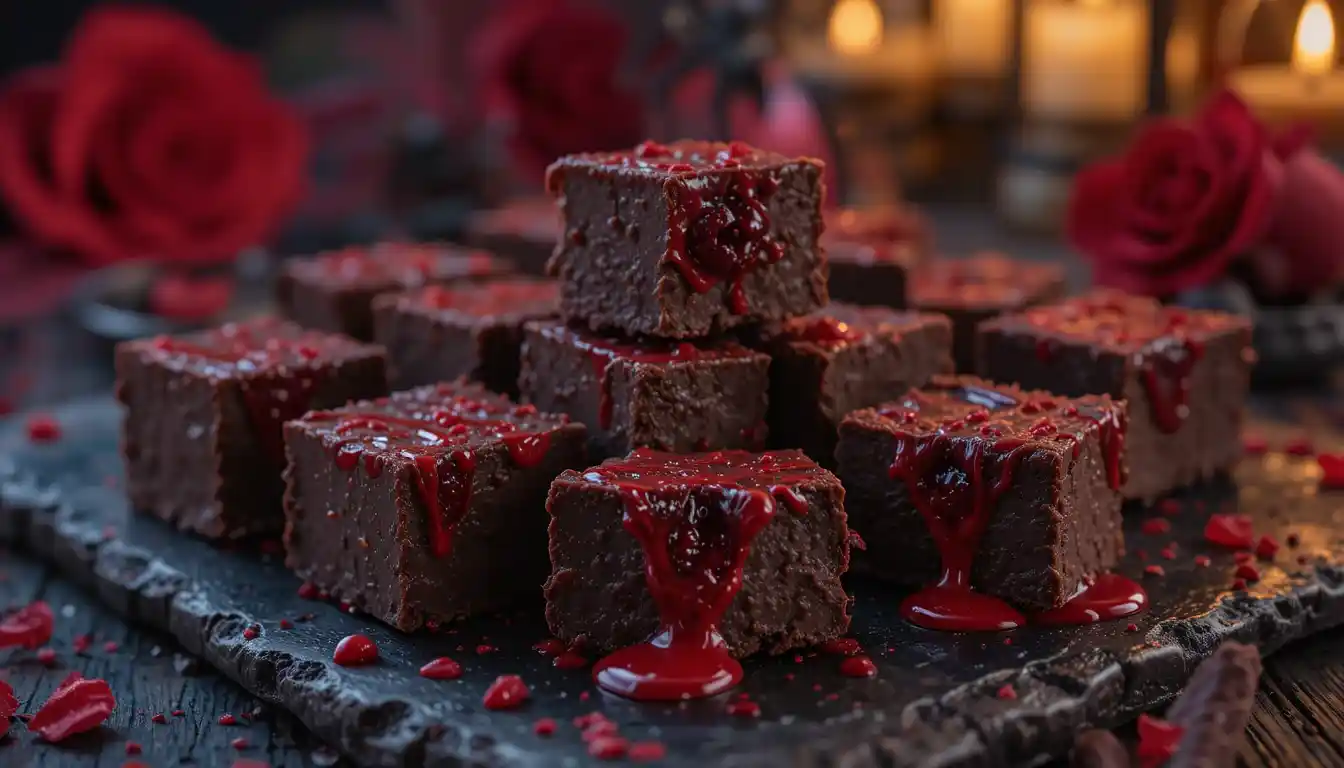
Halloween is just around the corner, and what better way to celebrate than with a treat that’s as spooky as it is scrumptious? Imagine a rich, creamy dark chocolate fudge infused with vibrant red swirls, evoking the eerie charm of the season.
This delicious treat is not only a visual delight but also a flavor sensation, perfect for Halloween gatherings or as a unique gift. Made with chocolate candy melts and a touch of coloring, it’s a simple yet impressive dessert to create.
You’ll be captivated by the contrast between the dark and sweet layers, making it a must-try for anyone looking to add a special touch to their Halloween festivities.
What Makes Vampire Fudge Special
The allure of Vampire Fudge lies in its dual appeal: a feast for both the eyes and the taste buds. Made with swirls of white and dark chocolate candy melts, this fudge is both a visual and flavorful delight. Infused with bold hues of red and black, it’s the perfect treat for any Halloween gathering or seasonal celebration.
The Spooky Visual Appeal
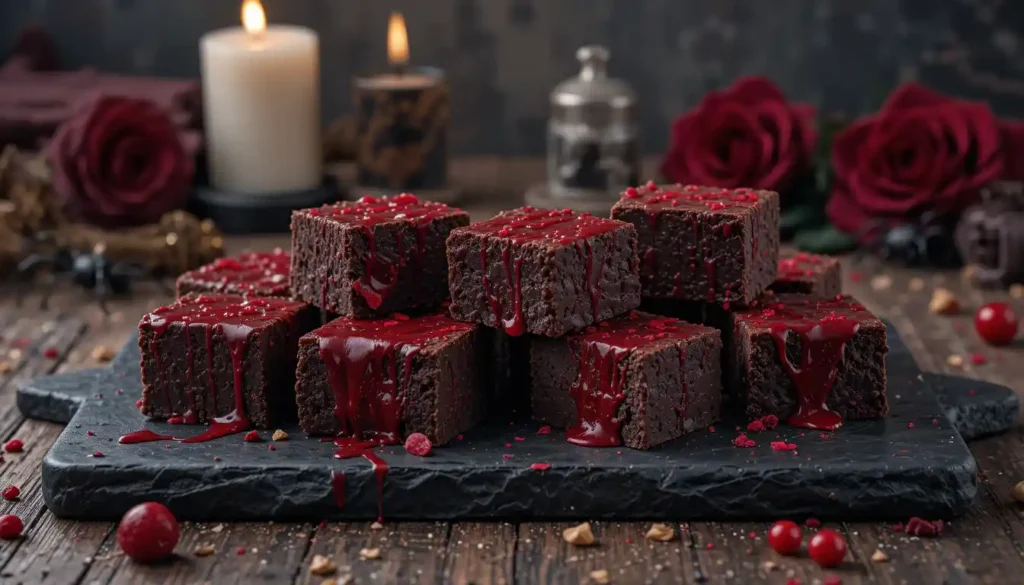
The dramatic contrast between the dark chocolate and vibrant red “blood” layers creates an instantly recognizable vampire-themed visual that stands out on any Halloween dessert table. The marbled or swirled effect mimics the appearance of blood, creating a spooky yet appetizing aesthetic that’s perfect for Halloween without being too graphic for younger guests.
- The layered approach creates visual interest from every angle, making it particularly photogenic for social media sharing or Halloween party displays.
- The combination of white and dark chocolate layers provides a delightful flavor contrast that elevates this treat beyond simple novelty status.
Rich and Creamy Texture
Unlike many themed desserts that sacrifice taste for appearance, Vampire Fudge delivers on both fronts with its rich, creamy texture and balanced sweetness. The smooth, melt-in-your-mouth consistency comes from the careful balance of ingredients and proper setting techniques.
- The fudge maintains its shape at room temperature while still remaining pleasantly soft when bitten into, creating an ideal textural experience.
- The recipe’s versatility allows for customization in both flavor intensity and visual effect, making it adaptable to different preferences while maintaining its vampire theme.
Essential Ingredients for Vampire Fudge
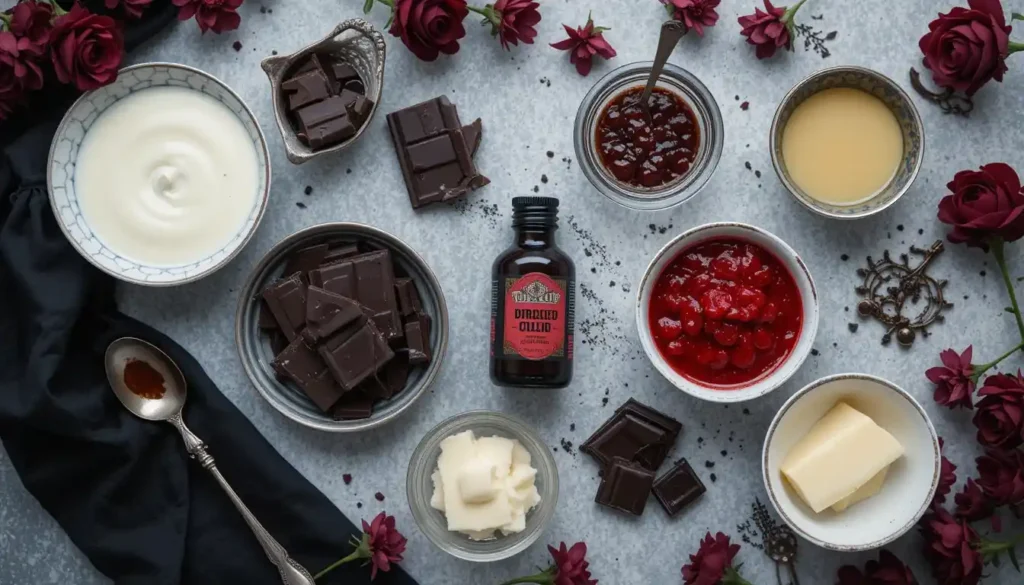
To make Vampire Fudge, you’ll need a few essential ingredients that deliver both visual impact and delicious flavor. The right ingredients are crucial for achieving the signature vampire effect and ensuring a tasty treat.
Candy Melts vs. Chocolate Chips
The foundation of Vampire Fudge relies on quality ingredients, with candy melts being preferred over standard chocolate chips for their stability and meltability. White candy melts serve as the base for the “blood” layer, taking on the red food coloring more effectively than other chocolate varieties while maintaining a smooth consistency.
Dark chocolate candy melts create the contrasting layer, providing rich flavor and the perfect canvas for the black food coloring that gives the fudge its dramatic vampire-inspired look. The use of oil-based food coloring is essential for this recipe, as water-based alternatives can cause the chocolate to seize and become grainy, ruining both texture and appearance.
Choosing the Right Food Coloring
The choice of food coloring is critical in achieving the vibrant red “blood” color that defines this Halloween treat. Red oil-based food coloring transforms the white candy melts into a vivid red, enhancing the “bloody” aesthetic of the fudge. Similarly, black oil-based food coloring adds an intense black hue to the dark chocolate melts, creating a bold Halloween effect.
Vanilla frosting acts as a binding agent that helps achieve the perfect fudge consistency while adding sweetness and ensuring the layers set properly. The recipe requires specific ratios of ingredients to achieve the ideal balance between firmness for clean cutting and creaminess for enjoyable eating.
Equipment You’ll Need
Having the correct tools on hand is vital for a smooth Vampire Fudge-making process. To ensure you can create this spooky treat without any hiccups, it’s essential to prepare your baking station with the necessary equipment.
Baking Dish Preparation
To start, you’ll need an 8×8-inch square baking dish, which is the ideal size for this recipe. It creates the perfect thickness for the fudge layers while allowing enough surface area for dramatic swirl effects. Properly lining your baking dish with parchment paper is crucial for easy removal and clean cutting later. Make sure to leave extra overhang on at least two sides to act as “handles” to lift the set fudge.
To prevent sticking, you can also lightly spray the pan with cooking spray before adding the parchment paper. This step ensures that your fudge will release from the pan without sticking.
Tools for Perfect Swirls
In addition to the baking dish, you’ll need a few other tools to achieve the signature Vampire Fudge look. Here are the essentials:
- Two microwave-safe bowls for melting and mixing the different colored layers separately before combining them in the baking dish.
- A toothpick, skewer, or butter knife is essential for creating the signature blood-like swirls that give Vampire Fudge its distinctive appearance.
- A rubber spatula helps ensure you get every bit of the mixture out of the bowls and spread evenly in the pan for consistent thickness.
- A sharp knife is necessary for clean cutting, while a ruler can help ensure uniform pieces if you’re aiming for perfect squares.
- Optional equipment includes a candy thermometer for those who prefer precise temperature control, though this recipe is designed to work without one.
Having all equipment ready before beginning is important as the fudge mixture sets quickly and requires prompt handling for the best results. By being prepared, you’ll be able to enjoy a smooth and stress-free fudge-making experience.
Vampire Fudge Recipe Step-by-Step
Creating vampire fudge is a straightforward process that involves preparing the base layers, creating the blood-red layer, and achieving a spooky swirl effect. To start, you need to prepare your workspace and measure all the ingredients in advance, as the fudge-making process moves quickly once started.
Preparing the Base Layers
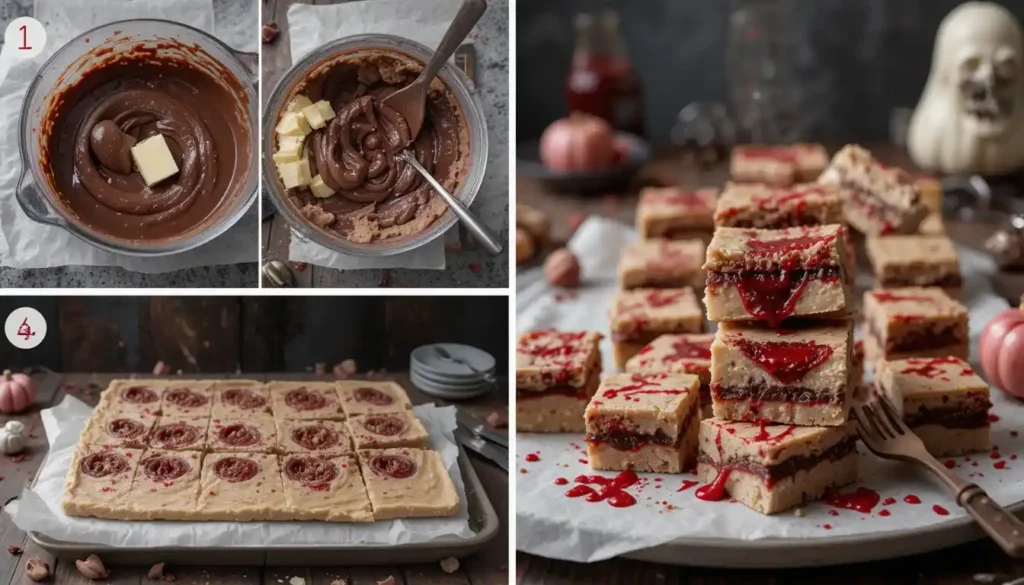
Begin by combining 1 1/2 cups of white chocolate chips, 1/2 can of sweetened condensed milk, cocoa powder, and butter in a medium saucepan. Heat the mixture over low heat, stirring until smooth. If desired, stir in black food coloring to achieve the desired intensity for your dark chocolate layer. Pour the mixture into a prepared pan and spread it evenly. Chill for 10 minutes to set.
Creating the Blood-Red Layer
In another saucepan, melt the remaining white chocolate chips and condensed milk over low heat, stirring until smooth. Add vanilla extract to enhance the flavor, and then add red food coloring until you achieve a vibrant blood-red color. Pour this red fudge mixture over the chilled chocolate layer.
Swirling Technique for Spooky Effect
To create a marbled effect, use a toothpick or butter knife to swirl the layers in an “S” pattern or figure-eight motion. Be careful not to over-mix, as this can blend the colors too much. After swirling, gently tap the pan on the counter to remove any air bubbles and create a smooth surface.
- Alternate dollops of the dark chocolate and blood-red mixtures in the prepared baking dish to create a foundation for effective swirling.
- Ensure both colors are distributed throughout the pan for a marbled effect.
- Use a toothpick or butter knife to create the swirl effect, dragging it through the layers in a pattern.
Tips for Perfect Vampire Fudge
Crafting Vampire Fudge that’s both spooky and delicious requires some insider tips. To achieve the perfect treat, it’s crucial to understand the nuances of working with chocolate and candy melts.
Achieving the Right Consistency
The consistency of your Vampire Fudge is paramount. Temperature control is crucial when working with chocolate and candy melts. Too much heat can cause the mixture to seize or become grainy, while insufficient melting leads to lumps in the final product.
When melting ingredients in the microwave, always use 30-second intervals and stir between each to prevent overheating and ensure even melting throughout the mixture. If your fudge mixture appears too thick or stiff to pour easily, add a teaspoon of vegetable oil or shortening to thin it slightly without affecting the setting properties.
Conversely, if your mixture seems too runny, you can add a few more melted candy melts to thicken it, but be careful to maintain the color intensity. The quality of your food coloring significantly impacts the final appearance—gel or oil-based colors provide more vibrant results than water-based varieties and won’t affect the texture of your chocolate.
| Tip | Purpose | Effect |
|---|---|---|
| Use 30-second microwave intervals | Prevent overheating | Ensures even melting |
| Add vegetable oil or shortening | Thin thick mixture | Improves pourability |
| Use gel or oil-based food coloring | Enhance color vibrancy | Maintains chocolate texture |
Troubleshooting Common Issues
If your fudge isn’t setting properly in the refrigerator, it may be due to excess moisture in the mixture or insufficient chilling time—allow at least 2 hours for complete setting. For the most dramatic vampire effect, aim for a true blood-red color rather than pink or orange tones, which may require more food coloring than you initially expect.
As an expert tip, using candy melts is recommended over chocolate chips for this recipe due to their stabilizers and reduced cocoa butter, making them ideal for smooth, consistent fudge. Store-bought frosting can react poorly with the cocoa butter in chocolate, causing the mixture to seize.
“The quality of your food coloring can make or break the visual appeal of your Vampire Fudge. Opt for gel or oil-based colors for the most vibrant results.”
By following these tips and being mindful of the factors that affect the consistency and appearance of your Vampire Fudge, you’ll be able to create a treat that’s both delicious and visually striking.
Cutting and Serving Your Vampire Fudge
Transforming your Vampire Fudge into bite-sized pieces is a crucial step before serving. To achieve clean cuts and maintain the fudge’s integrity, it’s essential to follow a few simple steps.
Creative Cutting Ideas
To add an extra layer of creativity to your Vampire Fudge, consider using Halloween-themed cookie cutters. Shapes like bats, coffins, or tombstones can enhance the vampire theme and make your fudge stand out at any Halloween gathering. If you prefer a more traditional approach, cutting the fudge into squares is equally effective.
To cut your fudge effectively, start by ensuring it is completely set. Refrigerate it for at least 2 hours or overnight for the cleanest results. Use a sharp knife to make cutting easier and to achieve clean edges. For smoother slicing, dip the knife in hot water before each cut, and wipe it clean between cuts to prevent sticking.
- Remove the fudge block from the pan by lifting the parchment paper handles to give yourself ample working space.
- For professional-looking squares, use a ruler as a guide and a sharp chef’s knife dipped in hot water and wiped dry between each cut.
- Consider trimming any uneven edges formed by the pan before slicing into squares for the cleanest cuts.
| Cutting Technique | Description | Benefit |
|---|---|---|
| Sharp Knife | Use a sharp blade for cutting. | Gives clean edges and makes cutting easier. |
| Warm Knife | Dip the knife in hot water before cutting. | Results in smoother slicing. |
| Clean Between Cuts | Wipe the knife clean between cuts. | Prevents sticking and ensures clean cuts. |
Presentation Tips for Halloween Parties
When serving your Vampire Fudge at a Halloween party, presentation is key. Arrange the fudge pieces on a black platter or cake stand and add some fake cobwebs or plastic spiders to enhance the spooky atmosphere. For an extra dramatic effect, dust the serving platter with a small amount of cocoa powder to resemble dirt or sprinkle with red sugar crystals to mimic scattered blood droplets.
To keep your fudge fresh and maintain its shape, especially when serving outdoors or in warm environments, keep it chilled until shortly before serving. For individual servings, consider wrapping pieces in wax paper or placing them in mini cupcake liners, then arrange on a tiered stand for an impressive dessert table centerpiece.
Storing Your Vampire Fudge
To keep your Vampire Fudge tasting its best, you’ll need to store it correctly, whether that’s at room temperature, in the refrigerator, or in the freezer. The storage method you choose will depend on how soon you plan to enjoy your fudge and your personal preference for texture.
Storage Options
There are several ways to store Vampire Fudge, each with its own benefits. At room temperature, fudge can last for 1-2 weeks when stored in an airtight container in a cool, dry place. To prevent sticking, place parchment paper between layers of fudge.
For a firmer texture, you can store the fudge in the refrigerator for up to 3-4 weeks. However, be aware that refrigeration can cause the fudge to become slightly crumbly over time.
| Storage Method | Duration | Texture |
|---|---|---|
| Room Temperature | 1-2 weeks | Soft, creamy |
| Refrigerator | 3-4 weeks | Firmer, potentially crumbly |
| Freezer | 2-3 months | Maintains texture when thawed properly |
Freezing for Long-Term Enjoyment
For long-term storage, freezing is an excellent option. Wrap the fudge in plastic wrap and then in aluminum foil before placing it in an airtight container. If you’ve already cut the fudge, wrap each piece individually in plastic wrap and store them in a freezer-safe container with parchment paper between layers.
When you’re ready to enjoy your frozen fudge, simply transfer it to the refrigerator to thaw overnight. Properly stored Vampire Fudge can maintain its quality and flavor for several weeks, making it a great make-ahead treat for Halloween parties or gifting.
Conclusion
Creating Vampire Fudge is a fun and rewarding experience, resulting in a treat that’s both visually striking and delicious. Whether you’re hosting a party or just want to add a spooky touch to your Halloween dessert spread, this recipe is a simple yet festive treat.
The contrast between the dark chocolate layer and the blood-red fudge gives it an eye-catching appearance, making it perfect for your ghoulish guests. The Vampire Fudge represents the perfect balance of visual appeal and delicious taste, making it an ideal addition to your Halloween recipe collection.
Some key takeaways from this recipe include the importance of temperature control, proper ingredient selection, and allowing adequate time for setting. You can also experiment with slight variations in flavors by adding extracts like peppermint or almond to the base recipe while maintaining the signature vampire appearance. By adding a teaspoon of vanilla extract or a hint of your preferred flavor to the mix, you can further enhance the taste, making it even more delightful to share with friends and family in a cup.
In conclusion, Vampire Fudge is not just a dessert; it’s an experience that combines fun, creativity, and deliciousness, making it a must-try for any Halloween celebration or as a seasonal gift.
FAQ
What type of chocolate is best for making Vampire Fudge?
Dark chocolate or dark chocolate chips are ideal for creating a rich and decadent Vampire Fudge. You can also use cocoa powder to enhance the chocolate flavor.
How do I achieve the blood-red color in my fudge?
To achieve the blood-red color, you can add a few drops of red food coloring to your fudge mixture. Start with a small amount and adjust to achieve the desired shade. You can also mix black food coloring with red to create a deeper, darker color.
What is the best way to prevent my fudge from sticking to the pan?
To prevent sticking, line your baking dish with parchment paper or use cooking spray to grease the pan. This will ensure that your fudge releases easily once it’s set.
How do I store my Vampire Fudge to maintain its texture and flavor?
Store your Vampire Fudge in an airtight container at room temperature or in the refrigerator to maintain its texture and flavor. You can also freeze it for future enjoyment.
Can I customize my Vampire Fudge with different flavors or mix-ins?
Yes, you can customize your Vampire Fudge by adding different mix-ins, such as nuts or dried fruit, or by using different flavor extracts, like vanilla extract, to create unique variations.
How do I achieve the perfect swirl design on top of my fudge?
To achieve the perfect swirl design, use a knife or spatula to gently swirl the top layer of your fudge. You can also use a plastic wrap or spatula to create a marbled effect.
Can I make Vampire Fudge without milk or dairy products?
Yes, you can make Vampire Fudge without milk or dairy products by using alternative milk sources, such as almond milk or coconut milk, and dairy-free chocolate.
1 thought on “Vampire Fudge Recipe: A Spooky and Delicious Treat”
Comments are closed.