
Table of Contents
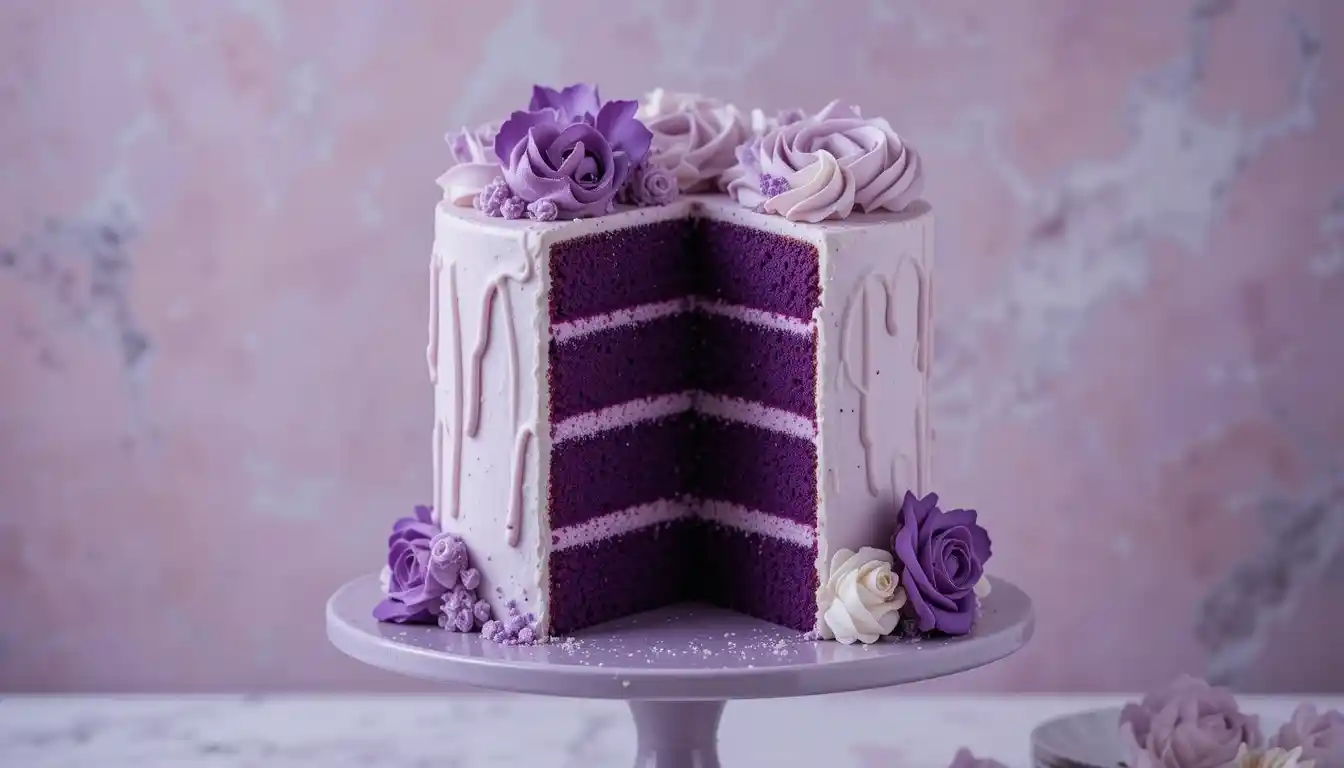
Imagine a cake that’s not only a feast for the taste buds but also a visual masterpiece. The purple velvet cake is a stunning twist on the classic red velvet, boasting a vibrant purple hue that’s sure to impress your guests.
This unique dessert combines the moist, cocoa-flavored crumb of traditional velvet cakes with the modern touch of purple food coloring, creating a truly show-stopping treat. Paired with a rich cream cheese frosting, this cake is a perfect blend of flavors and textures.
To achieve this culinary masterpiece, you’ll need to carefully select your ingredients, including flour and precise measurements in cups. By following a tried-and-true recipe and mastering the art of baking, you’ll be able to create a bakery-quality dessert in the comfort of your own kitchen.
The Magic of Purple Velvet Cake
The allure of purple velvet cake lies in its unique texture and captivating color. This cake is not just a treat for the taste buds but also a feast for the eyes.
Velvet cakes are renowned for their fine, soft crumb and velvety texture, which is achieved through the chemical reaction between cocoa powder, vinegar, and buttermilk. This reaction creates the signature tenderness that characterizes velvet cakes.
What Makes Velvet Cakes Special
Velvet cakes earn their name from their incredibly soft, fine-textured crumb. The unique chemistry between acidic ingredients like buttermilk and vinegar, and non-Dutch processed cocoa, creates the signature velvety texture.
- The subtle cocoa flavor provides depth without overwhelming the palate.
- Understanding the science behind velvet cakes helps bakers appreciate the importance of precise measurements and specific ingredients.
Purple vs. Red Velvet: The Colorful Difference
The primary difference between purple and red velvet cake is the color, which allows for creative expression while maintaining the same delicious taste experience. Purple velvet cake offers a modern, whimsical twist on the classic red velvet.
| Characteristics | Purple Velvet | Red Velvet |
|---|---|---|
| Color | Purple | Red |
| Texture | Velvety | Velvety |
| Flavor Profile | Subtle cocoa flavor | Subtle cocoa flavor |
As a popular saying goes, “The way to a person’s heart is through their stomach.” This rings true for purple velvet cake, which is sure to captivate anyone who tries it.
“The best cakes are those that are made with love and care, and purple velvet cake is no exception.”
Anonymous
The History Behind Velvet Cakes
Red velvet cake, the precursor to purple velvet cake, has a fascinating history that dates back to the end of the 19th century. The original red velvet cake was known for its subtle red color, which was a result of a chemical reaction between the cocoa’s anthocyanins, buttermilk, and vinegar.
Origins of Red Velvet Cake
Red velvet cake emerged in the late 19th century and gained popularity during the Victorian era. It was considered a refined dessert due to its smooth, fine texture.
- The original red color was subtle and naturally occurring.
- The Adams Extract company promoted red food coloring alongside red velvet cake recipes during the Great Depression.
- The iconic Waldorf Astoria Hotel in New York played a significant role in popularizing red velvet cake in the 1920s.
The Modern Twist: Purple Velvet
Purple velvet cake represents the modern evolution of the classic red velvet cake, embracing contemporary food trends. The shift to purple coloring allows bakers to create stunning desserts for themed events or holidays. Cream cheese frosting remains a standard pairing for velvet cakes, a tradition that began in the mid-20th century.
Essential Ingredients for Purple Velvet Cake
To make the perfect purple velvet cake, you’ll need to gather a few essential ingredients. The quality and combination of these ingredients will determine the taste, texture, and appearance of your cake.
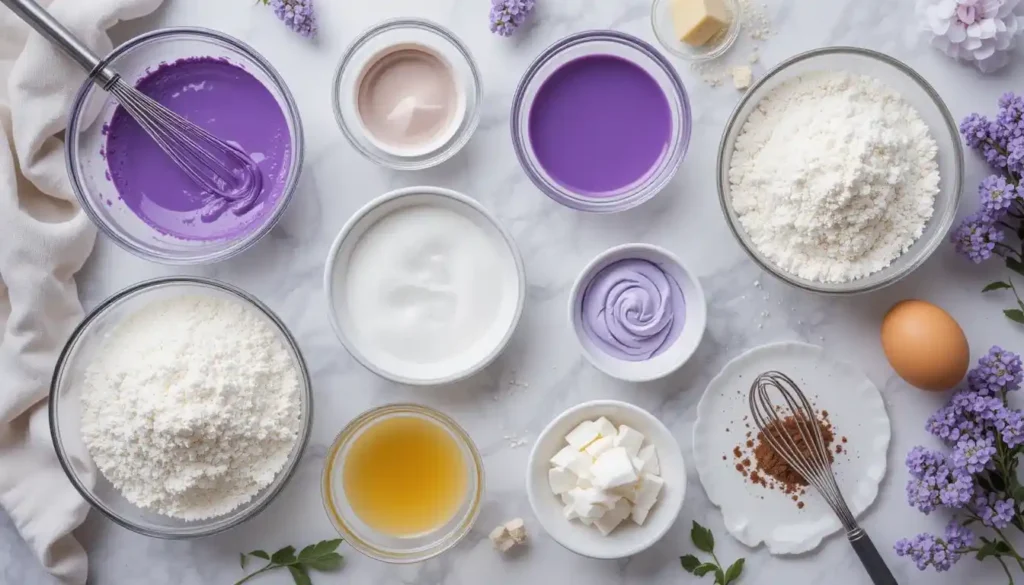
Dry Ingredients
The dry ingredients form the base structure of your cake. You’ll need 2½ cups of all-purpose flour, which can be substituted with cake flour for a tender crumb. Other dry ingredients include 1 teaspoon of baking soda to help the cake rise, 1 teaspoon of salt to enhance flavor, and 1 teaspoon of unsweetened cocoa powder for a subtle chocolate undertone.
Wet Ingredients
The wet ingredients add moisture and flavor to your cake. You’ll need 1½ cups of granulated sugar, 1½ cups of vegetable oil, 1 cup of buttermilk at room temperature, 2 large eggs at room temperature, and 1 teaspoon of vanilla extract. Additionally, 1 teaspoon of white distilled vinegar helps to activate the baking soda and contribute to the cake’s tender crumb.
The Secret to Perfect Purple Color
Achieving the perfect purple color is crucial for a purple velvet cake. You’ll need high-quality purple food coloring, preferably gel food coloring, to achieve a vibrant purple hue without adding excess liquid to your batter.
Kitchen Tools You’ll Need
Before you start baking your purple velvet cake, it’s essential to have the right kitchen tools. To ensure a smooth process, gather all necessary equipment.
Baking Equipment
For baking, you’ll need two 9-inch round pans. Parchment paper is also crucial as it prevents cake layers from sticking to the pans.
Mixing and Measuring Tools
Accurate measuring cups and spoons are vital for achieving the right texture. You’ll also need mixing bowls, an electric mixer, a rubber spatula, a whisk, and a wire cooling rack. A digital kitchen scale can help with precise measurements, especially for flour.
Preparing Your Workspace
Before you start mixing your purple velvet cake batter, it’s crucial to prepare your workspace for a smooth baking experience. This involves clearing ample counter space and gathering all necessary ingredients and equipment.
Setting Up for Success
To set up for success, begin by organizing your ingredients and tools. Allow items like eggs, butter, and buttermilk to come to room temperature, which typically takes about 30-60 minutes. This step is crucial because room temperature ingredients incorporate more easily, creating a smoother batter that’s essential for achieving the velvety texture of your purple velvet cake.
- Gather all ingredients before starting to ensure you have everything needed.
- Arrange your ingredients in the order they’ll be used to streamline the mixing process.
- Keep a clean, damp cloth nearby to maintain a tidy workspace.
Preheating and Pan Preparation
Preheating your oven to the correct temperature is vital. Preheat your oven to 350°F (175°C) before you begin mixing your batter. Proper pan preparation is also key: grease your pans, line them with parchment paper, grease the parchment, and dust with cocoa powder to prevent white residue on your cake layers.
| Task | Description |
|---|---|
| Preheat Oven | Set oven to 350°F (175°C) |
| Prepare Pans | Grease, line with parchment, grease parchment, dust with cocoa powder |
| Ingredient Preparation | Bring eggs, butter, and buttermilk to room temperature |
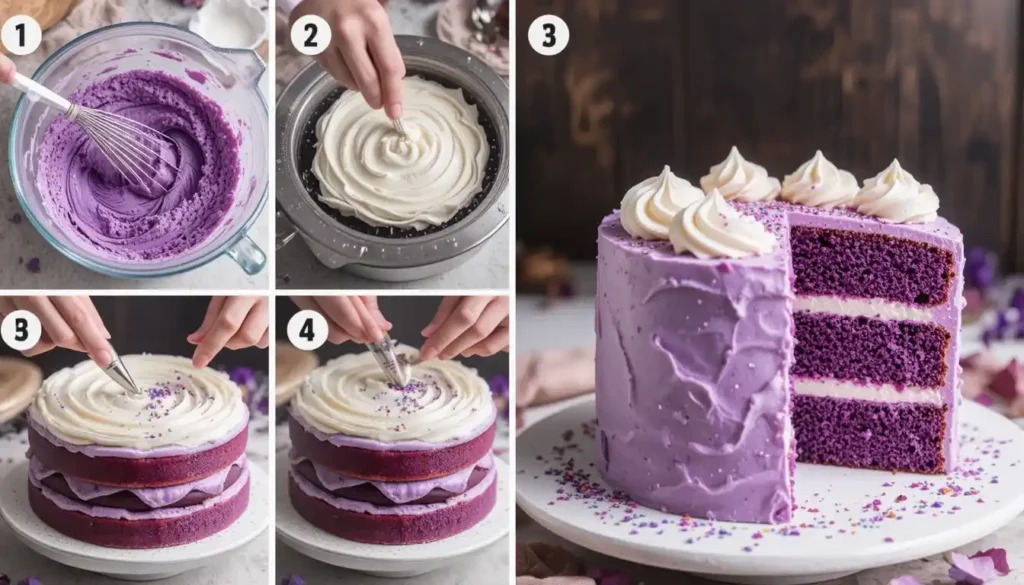
Making the Perfect Purple Velvet Cake Batter
A well-crafted batter is the foundation of a delicious and visually appealing purple velvet cake. To achieve this, you need to carefully prepare both the dry and wet ingredients.
Mixing the Dry Ingredients
Begin by sifting together dry ingredients like flour, cocoa powder, baking soda, and salt to remove lumps and aerate the mixture. This step is crucial for achieving a light texture, especially when working with cocoa powder, which can form clumps.
Combining Wet Ingredients
In a separate bowl, cream room temperature butter until light and fluffy, then gradually add sugar. Beat in eggs one at a time, ensuring proper emulsification. Combine buttermilk, vinegar, and food coloring in a measuring cup, stirring gently.
Achieving the Perfect Purple Color
For the perfect purple hue, start with a small amount of gel food coloring and gradually increase until you reach your desired shade. Remember, the color will darken slightly during baking.
| Ingredient | Purpose |
|---|---|
| Dry Ingredients | Provides structure and texture |
| Wet Ingredients | Adds moisture and flavor |
| Food Coloring | Achieves the desired purple color |
Baking Your Purple Velvet Cake
To ensure your purple velvet cake turns out moist and flavorful, follow these baking guidelines. Baking is a critical step that requires attention to temperature and timing.
Oven Temperature and Timing
Preheat your oven to 350°F. Place your filled cake pans on the center rack, ensuring at least 2 inches of space between them for proper air circulation. Most purple velvet cakes take between 22-28 minutes to bake, but start checking for doneness around the 18-minute mark.
Testing for Doneness
The cake is done when a toothpick inserted into the center comes out clean or with a few moist crumbs. You can also check by gently pressing the center; it should spring back completely. Avoid overbaking, as this can cause the cake to lose its signature moisture and tenderness.
Cooling and Preparing for Frosting
Cooling your cake layers is a crucial step that requires patience and attention to detail. Proper cooling ensures that your layers are stable and ready for frosting.
Proper Cooling Techniques
After removing your cake layers from the oven, let them cool in the pans for exactly 10 minutes. This allows the structure to set while preventing sogginess from trapped steam.
- Place a clean kitchen towel over your cooling rack before turning out the layers to prevent the rack’s pattern from imprinting on your cake’s surface.
- For the most level layers, turn the cakes out of their pans upside-down onto the cooling rack.
- Allow your cake layers to cool completely to room temperature before attempting to level or frost them.
Leveling Your Cake Layers
Once cooled, use a long serrated knife or cake leveler to remove any domed tops, creating flat surfaces for stacking and frosting. You can also save the cake scraps for making cake pops or as decoration.
- For professional-level precision, mark the desired height around the circumference of each layer with toothpicks before leveling.
- Brush away any loose crumbs from the leveled surfaces before frosting to prevent them from mixing into your cream cheese frosting.
Creating the White Chocolate Cream Cheese Frosting
To elevate your purple velvet cake, you’ll need a frosting that’s just as impressive, and that’s where our white chocolate cream cheese frosting comes in. This frosting combines the tanginess of cream cheese with the sweetness of white chocolate, creating a delightful contrast to the deep purple cake.
Ingredients for Perfect Frosting
The ingredients for this frosting include 8 ounces of white chocolate, 12 ounces of softened cream cheese, 6 ounces of softened unsalted butter, and 1 teaspoon of vanilla. Using high-quality ingredients is crucial. Here are some key points to consider:
- Use full-fat cream cheese in block form for the best results.
- Ensure that both the cream cheese and unsalted butter are softened to room temperature for at least 1 hour.
- Melt the white chocolate slowly using a double boiler or microwave in short bursts, stirring frequently.
Mixing Techniques for Smooth Results
To achieve a smooth frosting, start by beating the softened cream cheese and butter together until completely smooth. Then, gradually add sifted sugar, beating well between additions to maintain a smooth texture.
Adding Purple Color to Your Frosting
For a purple-tinted frosting that complements the cake, start with a tiny amount of purple food coloring and adjust to achieve the desired shade. You can always add more coloring, but you can’t remove it once incorporated.
Assembling Your Purple Velvet Cake
With your cake layers baked to perfection, it’s time to assemble your Purple Velvet Cake. This step is crucial as it brings together the elements that make your cake visually appealing and delicious.
Layering Techniques
To start, place a small dollop of cream cheese frosting on your cake board or serving plate to anchor the first layer. Position your first cake layer flat side down to provide a stable foundation. Apply approximately 1 cup of cream cheese frosting to the top of the first layer, spreading it evenly to the edges using an offset spatula.
When adding the second layer, place it flat side up, creating the flattest possible surface for your final frosting. Align the second layer carefully with the first, ensuring they match up evenly.
Crumb Coating Basics
Apply a thin “crumb coat” of frosting over the entire assembled cake to seal in any loose crumbs. Refrigerate the cake for 15-30 minutes to set this initial layer, making the final frosting process cleaner and more professional-looking.
For the final layer of frosting, use a bench scraper held at a 90-degree angle to create smooth, even sides. You can achieve a rustic look by creating textured swirls with the back of a spoon or a sleek finish by smoothing the frosting with a hot, dry offset spatula.
| Assembly Step | Description | Tips |
|---|---|---|
| Layering | Place the first cake layer on the serving plate, apply frosting, and add the second layer. | Ensure layers are aligned and centered. |
| Crumb Coating | Apply a thin layer of frosting to seal in crumbs. | Refrigerate for 15-30 minutes to set. |
| Final Frosting | Apply the final layer of frosting. | Use a bench scraper for smooth sides. |
Take your time during assembly to avoid uneven layers or frosting gaps. The result will be a beautifully assembled Purple Velvet Cake showcasing its vibrant purple interior.
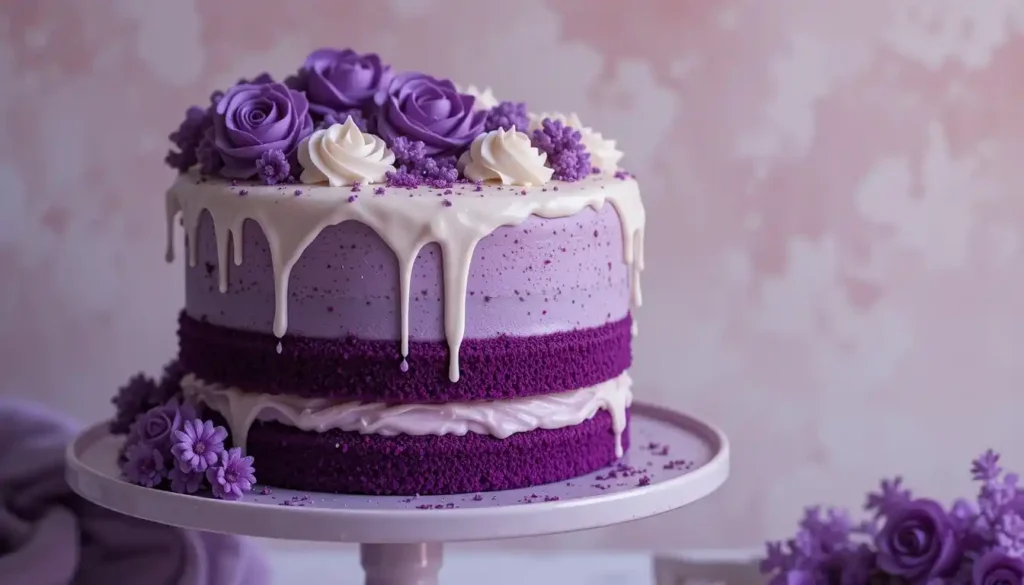
Decorating Your Purple Masterpiece
The final touch to your purple masterpiece lies in the art of decoration, elevating it from a simple cake to a work of art. With your cake assembled, you can now focus on the creative process of making it visually appealing.
Frosting Techniques
To achieve a professional finish, you can experiment with various frosting techniques. For a rustic look, use the back of a spoon to create textured swirls in the frosting. For a sleeker finish, dip your offset spatula in hot water, wipe it dry, and smooth the frosting. You can also use a cake comb to create horizontal lines or a hot, clean spatula for a perfectly smooth finish.
Creative Decoration Ideas
To add an extra layer of creativity to your cake, consider using purple-tinted white chocolate shards, fresh berries, or edible flowers as decorations. You can also create an ombre effect by tinting portions of your frosting different shades of purple and applying them in horizontal bands around the cake. Other ideas include using white chocolate curls, shards, or molded shapes, and adding a touch of edible gold or silver leaf for a luxurious contrast.
- Create an ombre effect with different shades of purple frosting.
- Use white chocolate decorations for a beautiful contrast.
- Add fresh berries or edible flowers for a natural look.
- Consider adding edible gold or silver leaf for luxury.
By incorporating these creative decoration ideas, you can make your purple velvet cake truly unique and visually stunning.
Troubleshooting Common Issues
Even with a great recipe, baking a purple velvet cake can present some hurdles. To achieve perfection, it’s essential to address common problems that may arise during the baking process.
Color Problems and Solutions
Achieving the perfect purple color can be challenging. If your cake’s purple color appears grayish or dull, it might be due to too much cocoa powder. To fix this, reduce the cocoa or increase the food coloring to achieve a more vibrant purple. For the most vibrant purple color, use gel or paste food coloring rather than liquid varieties.
Texture and Baking Challenges
If your cake is too dense, check that your baking soda is fresh and active. A dry, crumbly texture usually indicates overbaking or too much flour. Measure flour by spooning it into measuring cups and leveling off rather than scooping directly from the container.
Frosting Difficulties
If your cheese frosting is too soft, it may be due to warm ingredients or a warm kitchen. Chill the frosting for 15-20 minutes before attempting to frost the cake again. Ensure both unsalted butter and cream cheese are at the same room temperature before mixing to prevent curdling.
Serving and Storage Tips
The key to enjoying your purple velvet cake at its best lies in proper serving and storage techniques. To maintain its flavor and texture, it’s essential to handle your cake with care.
Best Way to Slice and Serve
For clean slices, use a long, thin knife dipped in hot water and wiped dry between each cut. This prevents the frosting from sticking to the blade. Pre-slicing the cake before serving can make it easier to manage, especially when showcasing the beautiful purple interior.
Keeping Your Cake Fresh
Store leftover cake in an airtight container in the refrigerator for up to 5 days. For the best flavor and texture, let the cake come to room temperature before serving after refrigeration. You can also freeze individual slices for up to 3 months and thaw them overnight in the refrigerator.
Conclusion
Your purple velvet cake is more than just a dessert; it’s a statement of culinary creativity and precision. By following this guide, you’ve learned how to combine traditional baking techniques with modern flair, resulting in a show-stopping dessert that’s both delicious and visually stunning.
The key to your success lies in understanding the chemistry behind the ingredients and the importance of precise measurements. The reaction between cocoa, buttermilk, and vinegar creates that signature velvety texture that makes this cake so special.
As you continue to bake and experiment, remember that the joy of baking comes not just from the finished product, but from the process itself. The versatility of this purple velvet cake makes it perfect for various occasions, from birthdays to dinner parties.
Consider this recipe a starting point for your creativity. Experiment with different shades of purple, frosting flavors, or decorative techniques to make your creations truly unique. With practice, you’ll refine your techniques and be able to share your delicious creations with others, making every step worthwhile.
FAQ
What is the best way to achieve a vibrant purple color in my velvet dessert?
To achieve a vibrant purple color, you can use a high-quality food coloring specifically designed for baking. Start with a small amount and adjust to achieve the desired shade, as the color can deepen during baking.
Can I substitute buttermilk with a different ingredient?
Yes, you can make a substitute for buttermilk by mixing 1 cup of milk with 1 tablespoon of white vinegar or lemon juice. Let it sit for 5-10 minutes to thicken before using in your recipe.
How do I ensure my cream cheese frosting is smooth and creamy?
To achieve a smooth and creamy cream cheese frosting, make sure your unsalted butter and cream cheese are at room temperature before mixing. Beat the ingredients until well combined and adjust the consistency as needed.
What is the best way to store leftover dessert?
To keep your dessert fresh, store it in an airtight container in the refrigerator. Allow it to come to room temperature before serving to ensure the best flavor and texture.
Can I use cocoa powder that is old or past its expiration date?
It’s best to use fresh cocoa powder for the best flavor. Old or expired cocoa powder may have lost its flavor and aroma, affecting the overall taste of your dessert.
How do I prevent my dessert from becoming too dense?
To prevent a dense dessert, make sure to not overmix the batter, and use the right ratio of dry ingredients to wet ingredients. Also, ensure your baking soda is fresh and not expired.
1 thought on “How to Make the Perfect Purple Velvet Cake”
Comments are closed.